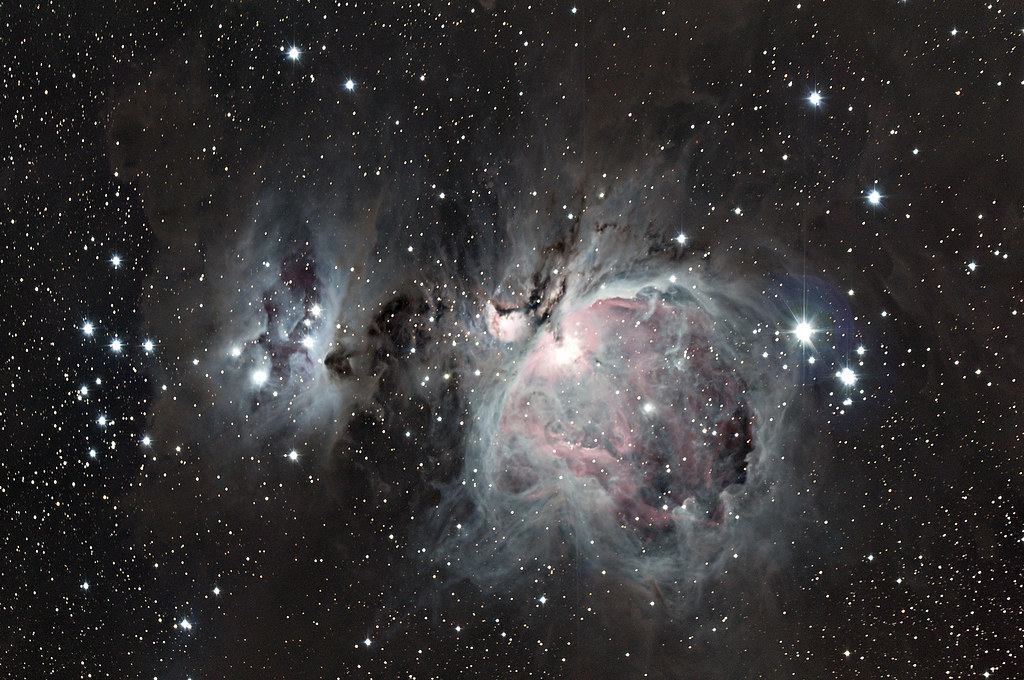
I thought to myself, I'll take a stab at M42 - the Great Orion Nebula and its surrounding region. With the 1.5º by 2º field of view I'd be able to capture plenty of the surrounding region and at f/2 I'd be able to capture it quickly. I decided to push my skills a bit and capture three sets of data.
- Deeply exposed subs to capture as much of the dust and faint nebulosity as possible - paying no attention to the overexposure in the core.
- Normally exposed shots designed to capture those mid-regions in the nebula.
- Knowing the center of the core would still be overexposed I also took a set of very short exposures to capture the core itself.

After achieving focus with my Canon 60d I set out to capture 32 sub exposures each of 120, 30 and 5 seconds each. When the first sub exposure rolled out of the camera, I gasped in amazement at how quickly the Hyperstar gathered light.
About 90 minutes later I had a plethora of data ready to be processed. At this point I was still capturing with the Canon EOS Utility because Maxim DL didn't yet support my camera. I've since moved to doing all of my capture and guiding using Maxim DL.
I was able to calibrate and stack the images in Maxim DL without issue and so I went off to create the next great astrophotographic masterpiece. I stacked the Short, Medium and Long exposures in Maxim DL and performed a log stretch, then a gamma stretch on the images. I finished by doing a linear screen stretch and saving as an uncompressed .tiff file.
 Next up was Photoshop CS5 to spin this raw data into astronomical gold. Oh did I stretch out those images. Using some aggressive curves, and setting levels I brought out all kinds of data in the image. I put the three of them together as successive layers and then manually blended them using layer masks. When I finished, I had some crazy looking photo - but I knew it wasn't good. The color was all wrong.
I continued to study and continued to learn. There were some kind words from the guys in the imaging forums over on Cloudy Nights, but I still knew the picture wasn't right. I moved on and kept plugging away at more images knowing that my best was ahead of me. I continued to have problems in other images with color balancing and really weird looking backgrounds. This is a good example of what I had been fighting all along - exaggerated here for effect.
 The blotchy background was being caused by my dark frames. Jerry Lodriguss was a great and patient help when sorting this out. I had gotten in the habit of taking my dark frames on different nights - and at different temperatures. As a result, the mismatched temperatures were creating noise in the image - not removing it. I set about to creating some new dark frames and paid attention to closely hand matching the temperatures when recalibrating the image. Some additional attempts to reprocess had better backgrounds, but not a better end result. The color was still all wrong.
After some additional study in Ron Wodaski's book The New Astro Zone for Imaging I finally understood the color balancing thing better. In a nutshell, I needed to match up the color bias at the low end by insuring that no particular color was more dominant or weak in the shadows. This was done by adjusting the shadow slider in levels for each individual channel to insure that they matched up. Again, there was some really aggressive curves applied, and I made use of a Color Balance adjustment layer. I used the tool on just the highlights to insure that the highlights all remained reasonably balance. By adding a bit of red and blue, and pulling back on the green I was able to color balance the image.
Finally, I had learned a whole new technique for blending the layer masks that turned out so much more natural - again from Jerry Lodriguss. The technique can be found on his website under Photoshop for Astrophotographers - Composites and Layer Masks. If you're new to astrophotography - pick up Jerry's books. They're indespensible, and he deserves the money. So nine weeks after taking the original shot, I managed to fix my dark frames issue and learn some processing techniques that turned out a much better end result. Hope you enjoy.