Jul 18, 2012

Taking Stock – The Software

Last time out I covered the hardware, which looks all pretty and imposing when it’s all setup – but it’s exactly half of the equation.  It’s the software that makes modern astrophotography possible.  In my own setup, the software plays a critical role in every step of the process from setting up to publishing a finished image.  In this second installment I’ll finish detailing the pieces of my imaging rig that all contribute to the end result and how it all fits together.  From this point forward it’s my hope that I can start tackling some specific tasks and how I handle them when it comes to deep sky imaging. 

PEMPro-V2

PEMPro is designed to a do a handful of things – chief among them is to measure and program periodic error correction on a telescope mount.  It excels at this task and I had excellent results using it on both of my previous mounts.  On my original Celestron CGEM I had a native periodic error of 17.6” peak to peak.  A couple of hours with PEMPro and I was able to program the mount with a curve that reduced it to 3.1”.  It helped me similarly in taming my Celestron CGE (52.1” down to 4.3”).  As I detailed in the last post, my Astro-Physics AP900 has a native periodic error of 1.45” peak to peak.  I haven’t bothered to even try and improve that yet.  Interestingly, Astro-Physics uses a specialized version of PEMPro to measure and program the periodic error in their mounts prior to shipping them out. 
For me though, PEMPro’s greatest strength is in the Polar Align Wizard that is another of its functions.  I don’t have a permanent observatory so I’m setting up and aligning the equipment every time I go out to image.  I’ve managed to arrange my imaging rig and the setup workflow in such a way that I can be polar aligned well enough for 30 minute sub-exposures before the end of twilight.  PEMPro’s Polar Align Wizard is a huge part of that.  Essentially, it’s a computerized version of drift alignment that works as follows:
  • A quick routine is used to determine the camera’s orientation (position angle) and the calibration of North/South/East/West to the X/Y coordinates of the camera chip.  Typically this takes me about 2 minutes. 
  • PEMPro will measure a star near 0º declination and near the meridian by taking repeated subexposures and measuring the star’s drift over a period of time.  Typically, I do this for 7 minutes.
  • After selecting a star in the star field, PEMPro will draw an arrow and a circle over the frame and begin taking repeated images of the field.  Using the azimuth adjustment you simply adjust the mount east/west until the star is in the circle drawn. 
  • Altitude is then set by moving 45º relative (east or west) to the meridian and repeating the 7 minute measuring phase. 
  • After selecting a star in the star field, center it in the superimposed circle using only the altitude adjustment on the mount.
  • Repeat if necessary.
It’s that simple and takes about 20 minutes.  Typically I’m starting this process as soon as any star bright enough to see naked eye appears near the meridian and 0º declination.  As I mentioned, I’ll write a post on my entire process some time in the future.  My method gets my polar alignment to about 1 arc minute from the celestial pole before the end of astronomical twilight and a big part of that is due to PEMPro

Maxim DL

Maxim DL is one of those suite software appllications that tries to be all things to all people and it does a pretty good job of it.  Nearly everything that has anything to do with data acquisition goes through Maxim DL in my setup.  I use Maxim DL to control the telescope and the camera through every phase of capturing data.  I use Maxim DL to:
  • Align the telescope at the beginning of the evening. Using the built-in PinPoint LE astrometry software after polar alignment I can sync the telescope to a plate solved field and I’m done.  Ready to slew anywhere in the sky.
  • Slew the telescope.  Using the built in catalogs I’ll slew the telescope to the chosen object.  An automated exposure is taken after a slew and plate solved to ensure that I’m exactly centered on the field.
  • Focus the telescope.  Sort of.  I use Maxim DL to tweak the Moonlite focuser during a filter change to the appropriate offset for the filter being selected.  Real focusing chores are handled by FocusMax – which uses the camera control in Maxim DL to do it's thing.
  • Guide the telescope.  I use Maxim’s built in guiding capabilities to autoguide during subexposures. 
  • Full camera control including temperature regulation, switching filters, taking exposures and moving the telescope slightly to dither between exposures. 
  • Capture of calibration frames.  Dark, bias and flat frames are all taken with Maxim DL.  Soon I’ll be working to configure Maxim to automate flats through each filter using an Optec FlatMan.  Stay tuned for more on that.
  • Maxim DL does an excellent job of controlling the telescope to correctly capture the multiple frames needed for a mosaic. 
  • I use DDP in Maxim DL during an evening just to preview what kind of data I’m capturing.
  • Maxim DL has many other built in features for calibrating, stacking and processing images.  While they’re effective I have found that there are other tools that I like better for those tasks. 

PixInsight

imagePixInsight completely changed the way that I process images.  It’s software developed by astrophotographers specifically for the purpose of processing astrophotos.  It has gotten a bad rap by people who haven’t thoroughly investigated the product saying that the learning curve is steep and that educational resources are lacking.  I’ll agree that it’s a different approach to processing than most people are used to, but if you take the time to use the resources that are available it’s quite intuitive.  I use it for nearly all of my calibration, stacking and image processing.  The 800 pound gorilla known as PhotoShop still figures in to my image processing scheme for some final tweaks, but 95% of my workflow after I capture an image is done with this application.  I use it to:
  • Create master bias, dark and flat frames.  Here’s a tutorial on the creation of master calibration frames.
  • Calibrate, Register and Stack a series of light frames.  It takes more effort in PixInsight than in other applications but the end result is a much cleaner master light frame in my experience.  I stopped using Maxim DL’s calibration & stacking routines after the first using PixInsight’s methods just once.  
  • All image processing tasks including color calibration, background neutralization, stretching, contrast enhancement and teasing out detail in the image.
Expect to see some more entries into this column detailing various aspects and techniques that I use in PixInsight.  Meanwhile, if you’re interested in learning more there are abundant resources on the web.  Start at the PixInsight website.  Many tutorials are there.  Also, go to Harry's Astro Shed and start there.  I learned to process an image by taking one of my own and just walking through Harry’s tutorials.  I haven’t personally seen them myself – but I know that Warren Keller and Rogelio Bernal Andreo are working on a tutorial series at IP4AP.  I’ve seen the Photoshop series that Warren did and it is an excellent resource.  M81 and M82 shown below was the first image I processed in PixInsight. 


PhotoShop CS5

The heavyweight of all image processing packages is without question Adobe’s PhotoShop.  I once used it for everything I did in a stacked image but it has fallen very much by the wayside since I picked up PixInsight.  In all fairness though, I do still use it at the very end of my workflow to do some final background smoothing, perhaps an Unsharp Mask and to resize/save the image for publishing on the web.  There are a lot of resources available to learn how to process an image with PhotoShop.  I found Adam Block’s DVD “Making Every Pixel Count” to be the best among them.  I’ve since met Adam and had an opportunity to pick his brain on a couple of things.  He’s a gracious guy who’s more than willing to share his extensive knowledge.  Check out one of his imaging workshops if you want some hands on experience with him.

What’s Missing?

If I had to go through the rest of my life with just the equipment and software that I have I could still die a happy man.  I don’t think that I’m missing any critical piece of the puzzle any longer.  But let’s face it – astrophotographers are probably the most desperate breed of astro-equipment junkies out there.  Now that I have a narrowband imaging rig and could conceivably image every clear night from my backyard it appears that imaging could become a threat to sleep and my ability to conduct what normal people call a normal life.  I’ll evaluate the situation before long and see if it makes sense to incorporate an automated imaging platform to handle imaging sessions for me.  I’ve been quietly eyeing CCD AutoPilot to fulfill that role but I’m not a point where I’m ready to seriously take on that task just yet.

With new moon coming tomorrow I hope that the Arizona monsoon cooperates enough to allow me a solid first light with the SBIG ST-8300 and filter wheel this weekend.  Once I get that incorporated into the workflow then I’ll see about the last couple of “nice to have” pieces – an off axis guider and an automated imaging platform.  Until then,  I continue to be a happy guy who has it far better than he deserves it.
Jul 17, 2012

Taking Stock - The Hardware

My wife Toni and I with the 15" Obsession
awaiting sunset at the 2012 Grand Canyon
North Rim Star Party
Do you ever just stop and look at your life and think, "Dude!!! Life is good!!"  I've been thinking that for awhile now.  Life is good, probably better than I deserve it.  My wife and daughters are awesome to be around and I supplement them with some great friends.  Through this brutal economic downturn I've been fortunate enough to stay steadily employed and prospects for the future are looking good as well.  I've had time to get back to the outdoors which I love; hiking and camping and traveling and just enjoying the world away from the busy city life.  I get more time now than I used to for astronomy and I've been fortunate enough to put together a decent astrophotography rig over the last 18 months.  I don't say all of this to boast, it's more of a reminder to myself to really enjoy the fortune that comes my way because it can all turn in a second and be gone.  I'm grateful for everything that I've been given in this life and I treasure every moment of it.

Astronomy-wise, I've reached a point with my imaging rig that I'm really close now to what I'd call "perfect" for me.  I've reached a point where it's time to take stock of what I have and where I'm at.  I haven't written in this blog much in the last 6 or 8 months but it's not that I haven't been hard at work getting on in this life.  Read back a little ways and you'll see that what's posted here is a grand departure from what I was rocking just a year ago.  So here's what I'm at and where I think it's all going.  This time around, I'll tackle the hardware.  Next time, it'll be the software and peripheral equipment.  And then hopefully, I can start sharing some of my own tips, tricks and thoughts about that equipment in upcoming installments.  I do feel like my skills have developed enough that I can contribute at least a little bit of useful knowledge back to the imaging community.  Check back in a year and we'll see if I'm right about all that.

Visual Astronomy

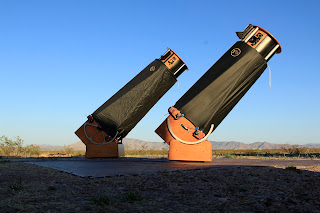
The 15" Obsession awaits the advanced darkness
of Portal, Arizona's skies back in April.  My friend
Chris's 20" Obsession is in the background.
Since I took up the dark art of deep sky imaging some 18 months ago I've always had this goal that I would build an imaging rig that would be semi-automated and I would be able to collect data and observe visually at the same time.  Finally, my imaging rig is approaching that ideal and I've been able to get more time to observe with my own peepers.  For 10 years now I have done my visual observing with my trusty 15" f/4.5 Obsession dobsonian.  For me it's been the perfect balance of large aperture, small size and excellent optics.  I doubt that I will ever part with it.  As my wife once said, "It's the type of telescope that you don't sell - ever!".  In the last 18 months, I've been fortunate enough to observe with some guys who are far better astronomers than I and I've learned bucketloads from them about seeing things in the night sky.  I'm embarrassed to say that a telescope of this caliber has probably been wasted on my unpracticed eye for this long.   One day, I'll write an entire column and give this telescope a proper review.  After ten years I think I've had it long enough to give a full run down of it's capabilities and it's minimal shortcomings.  Like any good astronomer, I check out those sexy new dobs with the super short focal ratios and ridiculous large aperture all the time.  But the bottom line is that I'll never exhaust the capabilities of this scope in my lifetime. 

The Mount - Astro-Physics AP900GTO
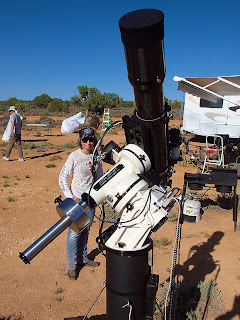
The AP900 waits for darkness at
the May 2012 annular eclipse in
southern Utah. 


I might have mentioned in another column once how I was pretty well set on my mount for awhile with my Hypertuned Celestron CGE.  I was happy with that mount at the time - but alas, it's not an Astro-Physics mount.  The opportunity to purchase an AP900GTO came along recently and I took advantage of it knowing that I'd likely keep the mount for the rest of my life.  When I chose this mount I also considered the AP1200 and the respective Paramounts but in the end decided this was the best choice based on size, weight and availability.  I haven't thus far been disappointed.  My friend Bruce who is not an amateur astronomer called the mount "industrial art" when he first saw it. 

I've only had it out a couple of times so far, but I couldn't be happier.  It just works.  With the electronics stored in the mount controller itself, I don't have to hook up the keypad to use the mount.  I just attached the laptop to the serial connection and the excellent Astro-Physics driver controls all the interaction with the mount from either MaximDL or SkyTools.  It can be controlled from any ASCOM compliant software but those are the two that I use.  After I get a little more experience with it I'll give it a proper review.  It's been a no fuss mount so far.  When I look at my guide logs I see that the autoguider is only sending a correction to the mount about once every 45 to 60 seconds.  So what erased any doubt about the quality of an AP mount for me?  I'm glad you asked.  Periodic Error tells the whole story.  Check out the graphic below:
  • Celestron CGE Uncorrected - 52 arc seconds peak to peak
  • Celestron CGE w/PEC Enabled - 4 arc seconds peak to peak
  • AP900 Uncorrected - 1.4 arc seconds peak to peak
At 1.45" peak to peak, the AP900 has less native periodic error than the seeing conditions in most people's skies.
I'll do a more in depth review of it soon, but some of the features of the AP900 that I'm in love with:
  • Setting the mount to slew/guide past the meridian
  • Daytime polar alignment procedure is a huge time saver when it gets dark.
  • It has more weight capacity than I'll ever need in a field portable mount.
  • 1.5 arc seconds of periodic error out of the box.  I haven't even bothered to measure PE with PEC enabled.  The seeing is never good enough to make a meaningful measurement.  If I dare say it - the mount is seeing limited. 

The Telescope - Explore Scientific ED127CF 


Explore Scientific ED127CF refractor
127mm f/7.5 carbon fiber triplet
I'll just say it.  I don't love diffraction spikes in my images.  If you look up "Diffraction Spike Admirer" in the dictionary you will not find my photograph next to it.  I know some people dig them.  I'm not one of them.  It's one of the main reasons I even started looking for something beyond Hyperstar.  The fast images were awesome and I still think it's the best way for a complete newbie to learn the imaging ropes - but those cables in front of the corrector plate created some nasty spikes in the images.  I have an 80mm refractor at home that I've had for awhile and I was curious how it would perform so I put it on a mount and took some frames.  I instantly fell in love with the spikeless stars and the much better color saturation and started shopping for a refractor.  I chose the Explore Scientific ED127CF.  So far, I'm really happy with the scope.  I don't know if this is the "lifetime imaging" scope yet, but I do like it.

I'd love to talk about how great of a job it does on the planets and the crisp, contrasty, color-free views that it gives through the eyepiece but I can't.  I've looked through the telescope exactly once.  It has spent its entire life thus far as an imaging scope save for that first night out.  I immediately replaced the focuser on the scope with a 2.5" Moonlite focuser with stepper motors.  In conjunction with FocusMax I've been able to eliminate the chore of manual focusing from an imaging run.  It takes about 30 seconds for the laptop to focus the telescope and it does a better job than even the trusty bahtinov mask.  Look for a full review of the ED127CF and it's suitability as an astrophotography platform coming sometime in the future.  My only complaint thus far is that there is a bit of blue fringing around brighter stars when I take long exposures through my QHY8PRO one shot color camera.  A monochrome camera and filters would solve that problem though...

The Camera - SBIG ST-8300M
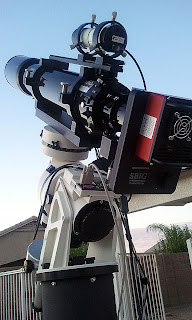
SBIG ST-8300M with FW8-8300
filter wheel.  The QHY5 and
50mm finder/guidescope is
also shown.


Say hello to the newest addition to the imaging rig.  I have made the transition to a mono camera and filters.  This addition is still so new that I haven't even had a proper first light yet - hopefully this weekend.  I recently bought an SBIG ST-8300m CCD camera and FW8-8300 filter wheel off of Astromart.  The deal also came with a full complement of Astrodon LRGB and 3nm narrowband filters. A test run in early July showed that the focuser didn't really have enough out-travel to reach focus with this setup.  I tried to cobble together a useable setup just to play around with it but the increased weight hanging off the end of the focuser created major flexure issues.  I ordered a focuser extension from Moonlite and a threaded adapter so that I have the most solid possible connection from camera to telescope.   Those parts are at home now but I haven't had a chance to assemble the rig and test it.  I've done some calculations and I expect that I'll be able to eliminate the need for a field flattener with this camera.  Experience will answer that for sure though.

I'm expecting big things from this camera and filter set.  With a full set of narrowband filters and our typical long stretches of excellent weather in Arizona I should be able to greatly increase the amount of time I have for imaging since they'll allow me to image from my moonlit, light polluted backyard.  The scope and camera combination provides me with an excellent image scale at 1.17"/pixel so I think this combination will be around for a long, long time.   

What's Missing?

I do believe that I'm really, really close to my perfect imaging rig here.  From a hardware standpoint I have the perfect mount.  My only complaint about the imaging scope is the violet color around the brightest of stars in a long exposure.  I expect that being able to focus each filter individually with my new mono camera will render that problem solved.  The camera is a nice size chip that's a proven performer and it's shooting through the best filters possible.  Much like my 15" Obsession, the imaging rig is setup in such a way that there's a lifetime of imaging there that I'll never be able to finish.  The only thing left that I would like to address is a better guiding solution.  I will probably add an off axis guider and a more sensitive guide camera some time in the near future.  At that point, there's nothing that I think I could improve from a hardware standpoint. 

I could possibly see an equipment rotator at some point in the future, but the system would have to demonstrate a real need for that piece of hardware.  Most people add the rotator to help them find suitable guide stars.  With the AP900 mount and a sensitive guide camera I should be able to take long enough guide exposures that I'll be able to find a guide star anywhere in the sky.  So I don't see it becoming a necessity - but experience is the best teacher.  I'll evaluate an equipment rotator once I've integrated the rest of this equipment.

Next time...I'll talk about the other half of the equation - software and the peripheral equipment.  Now that the hardware piece is (all but) completed, I'll turn my attention to the software integration and automation.  I'll share my thoughts and tips as I go.  Until then....here's the last image shot with the QHY8PRO camera and the first dark sky image shot with the AP900 - NGC 5907.  I shot this from the incredibly dark skies of southern Utah over the weekend of May 20th, 2012.  Here's hoping the monsoon cooperates and I can feature a new image here next week.

NGC 5907 - 7h 45m exposure (31 x 900s)