Aug 16, 2011

The North American Mosaic

As a member in good standing of the Saguaro Astronomy Club I've long vowed that if somebody asks me to give something back to this wonderful hobby chronic obsession in a way that might benefit someone else - that I would always say yes.  One of the great things about amateur astronomy is the general willingness of most people involved to share their knowledge in an effort to help the other guy.  One of the reasons that I write this blog (haphazard as it may be) is in an effort to share what I learn with a wider audience if anyone should be interested.  Each August our club has a meeting where all of the speakers are club members giving shortish presentations on the topic of their choice.  When I was asked to be one of the presenters I immediately agreed to the task even though I had no idea what I could talk about for 10 whole minutes beside myself - and audiences tend to find the subject of me to be an underwhelming one at best. 

A normal night at Fredericksen Meadow.
After pondering the possible topics for a few days I decided that I would cover the capture and processing involved in creating a CCD mosaic.  Never mind that I'd never actually even tried to do one myself. Nothing helps get the juices flowing better than a little bit of pressure, even if it's self-induced.  This was back at the end of June just after the new moon weekend.  No worries on my end though - I still had all of July and part of August to capture the data, create a mosaic image and put together a 10 minute presentation.  All I needed was a little bit of dark sky to capture the data.  I was confident that I could do the rest without too much trouble.  I planned a trip out in the middle of July solely to capture the raw data, but the Arizona monsoon season had other ideas and the weekend was clouded out.  Since I live in such a dry climate I immediately made plans to head north to my favorite observing site for the weekend with some friends in the cool pines and 7000' of Fredericksen Meadow in North/Central Arizona.  Three nights in the cool pines and I literally never even took the telescope out of the truck because it didn't stop raining and storming long enough to set up.  Shut out.  Again.  Not for loss though, it was a wonderful weekend hiking and hanging out with my astro-friends and just generally loving how awesome I have it in this life and how little I've done to deserve it.  Now I was beginning to get nervous.  I had only one weekend left to capture data - process the data - and be ready to present it the Friday after that. 

I casually threw out a comment to my friend Chris that I was thinking of a trip to the club's Antennas site to capture the data as he and I both live in advantageous locations for easy access to this dark sky site.  However - and you knew there would be a 'however' - it's in the western part of Arizona in the low desert at the end of July.  It is not uncommon for temperatures to sprint right past 110ºF early in the day and stay there until well after dark.  My last time there - on March 31st - it hit 102ºF and it was blazing hot for such an early spring day.  But I digress.  Other club members told us we were crazy.  I heard rumors that there was a collection taken up to have our heads examined.  Since no one has approached us, I'll assume that nobody contributed. 
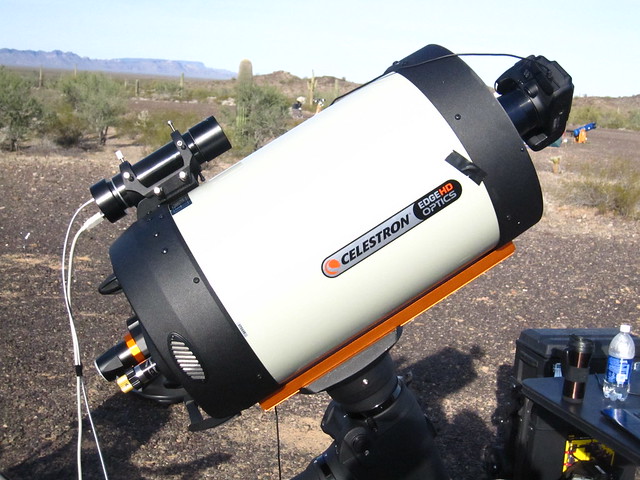
The 11" Edge HD and Hyperstar on a previous trip
to the Antennas site.
We made plans to arrive just after sunset and use the first couple of hours with the first quarter moon to get set up for the evening on this one night trip.  It was genius.  The Arizona monsoon couldn't have cooperated better.  The temperature when I arrived 5 minutes after sunset was 98ºF with 11% humidity and a slight breeze.  It was warm for sure, but comfortable.  By the time I completed setup and was ready to begin imaging at 9:30pm the temperature was down to 80ºF.  Chris and I enjoyed about 6 hours of imaging and observing in shorts and t-shirt weather under a beautiful mag 6.5 sky.  Using the Hyperstar rig I was able to capture 4 hours worth of data at f/2 on the North American & Pelican Nebulas to construct the mosaic.

To make a long story short, I constructed the mosaic and I was very happy with the result as shown above.  My presentation itself didn't go as well as I'd hoped.  I made the mistake (common with me) of trying to condense what was easily 45 minutes worth of material into ten.  I was really pleased to show off how I'd processed the image in Photoshop and had a series of slides that walked through the process.  The actual work in Photoshop went quite quickly so I put together a video-walkthrough of the steps that I took for some of my fellow club members who'd been asking me questions about my own workflow.

NGC 7000 and IC 5070 Mosaic (North American & Pelican Nebulae)
4 frame mosaic - 24 exposures - 2 minutes per sub exposure
Captured with a QHY8PRO CCD Camera
Celestron 1100HD Telescope with Hyperstar @ f/2 on a Celestron CGE Mount
 To make a long story short, I constructed the mosaic and I was very happy with the result as shown above.  My presentation itself didn't go as well as I'd hoped.  I made the mistake (common with me) of trying to condense what was easily 45 minutes worth of material into ten.  I was really pleased to show off how I'd processed the image in Photoshop and had a series of slides that walked through the process.  The actual work in Photoshop went quite quickly so I put together a video-walkthrough of the steps that I took for some of my fellow club members who'd been asking me questions about my own workflow.

It's just shy of 10 minutes a straight, unedited walkthrough that shows everything that was done in Photoshop to process the images after they were calibrated and stacked in Maxim DL.  I've added the video here too for anyone that might get some benefit out of it.  A couple of notes about the video:
  • There is no audio track in the video.  I simply hit record and did a walkthrough while Camtasia captured the screen for me. 
  • In the first step you'll see that I run an action against all 4 frames that isn't really shown.  That action is simply a curve followed by four iterations of levels that adjust the gamma slider.  I did this via action so that I could insure that all 4 frames were initially stretched with exactly the same settings.  There is no hidden voodoo there - and the later iterations of levels are all done in the same way.
  • Since I'm not sure how well this video is going to get mangled by the compression algorithms, Here is a link to a full Windows Media version.  It's a 21MB file, so you may want to download it before attempting to watch it.
  • The video does go through the steps pretty fast.  The pause button is your friend if you're trying to follow along and try any of it yourself. 

Jul 14, 2011

A Proper First Light Part Deux

I wrote recently about my trip to Starizona down in Tucson and Dean's efforts to help me straighten out my imaging rig.  Let me reiterate that he went far beyond what would be considered above and beyond the call of duty in helping me.  Only a week later I was able to get some time away from civilization over the Independence Day holiday in Northern Arizona.

It's funny that we call it Northern Arizona because at best, it's central but I digress.  The original plan called for five days of camping near Happy Jack, Arizona within sight of the Discovery Channel Telescope but in the end it ended up getting cut short by the onset of the Arizona monsoon.  With my wife, kids and some other astronomy friends the weekend promised to be a good one.  There was a lot at stake from an imaging perspective for me on this weekend as it was the first time that I'd be putting all of the pieces of my recently overhauled imaging system together under dark skies.  I've made a few changes recently:
  • I switched mounts from a Celestron CGEM to a Celestron CGE mount for the increased carrying capacity.  The new mount doesn't even seem to notice that the 11" scope and assorted goodies are even attached to it.
  • I upgraded the guide scope from a 9x50 finder with a camera attached to an 80mm f/7.5 Vixen refractor.  The increase in focal length from 170mm to 600mm should result in much more accurate guiding - important as I start trying to move to longer focal lengths for imaging.
  • This was the first trip to a dark sky since getting the secondary assembly on the OTA fixed and a new, shorter Hyperstar adapter for my QHY8PRO camera.
So what was the end result?  Nothing but good things.  I'm really impressed with the imaging system and how everything works together.  I've got a little work to do on collimation still, but overall the images are greatly improved.  I've attached a few that I'm happy with below - there's a few that aren't done yet that I haven't posted anywhere yet.  Stay tuned for them.

M5 - 15 x 60 seconds @ f/1.95
CGE Mounted Celestron 11" Edge HD, Hyperstar, QHY8PRO Camera

NGC 6888 - Crescent Nebula - 20 x 120 seconds @ f/1.95
CGE Mounted Celestron 11" Edge HD, Hyperstar, QHY8PRO Camera
IC5146 - Cocoon Nebula- 32 x 120 seconds @ f/1.95
CGE Mounted Celestron 11" Edge HD, Hyperstar, QHY8PRO Camera

Jun 27, 2011

Some Starizona Love and a Proper First Light

And thus is how I shall characterize the odyssey that was my weekend.  I had committed myself this past weekend to preparing for NEXT weekend - a five day astrophotography trip to Northern Arizona and 7000 feet of elevation under skies so dark that they can only be described as "ridonkulous" - but I digress.  Since making the jump from DSLR to OSC CCD back in April it's been nothing but a constant war bending the imaging system to my will.  And if I'm being honest it's been a war that I'm clearly losing.    Thursday night's backyard session ended again in frustration fighting tilt in the imaging train that left the Hyperstar looking like the leaning tower of Pisa.  I resolved to do something that is expressly forbidden to my typically male genetic code.  I decided I would ask for help.  I spoke with Scott at Starizona on Friday and decided to make the 140 mile drive down to Tucson for their public viewing session on Friday night where I could get a little assistance in figuring out what was going on with my whole rig.  So I packed up the essential pieces of the rig and made the southern trek with my amazing 14 year old daughter and co-pilot who insisted on making the trip with me.  We arrived about an hour before sunset and spoke with Dean about the whole situation and the chronology of events.  "Sounds like it could be the telescope itself.  Why don't you bring it in and let me take a look at it" he said.  My daughter carried the OTA into the shop while I dug out the CCD camera and Hyperstar as well.  When I got back into Starizona, Dean had mounted the C11 Edge HD onto a nearby AP900 mount to begin his assessment.  "That's it!! The OTA just needs a little 'spa' time!" I thought to myself.  This is predicated of course on the idea that just hanging out on an AP900 has to be the telescope equivalent of a nice massage at the local day spa.  It looked so glorious up there that I was stupified for a few moments.  Soon however, I came to my senses and went back outside to grab my cell phone and snap a picture of such a handsome scene - my scope kickin' it on the Astro-Physics mount.  Before I could get back outside Dean pointed out the overall collimation of the scope itself.  The entire corrector plate/secondary assembly on the Edge HD had slipped down and to the right very significantly.  This, he believed, was the source of all my troubles.  He told me he'd have it fixed really quickly and set out to do just that.  I went to the truck to get my cell phone and it's camera for the previously mentioned photo opportunity.  By the time I returned to the shop, the scene can only be described as one of instant horror.  It was like one of those sci-fi movies where the teenagers take a vacation to a posh tropical island only to wakeup on the beach and find that someone has stolen a kidney from them. 

My corrector plate was gone!!!  I found it on the other end of the room where Dean had begun his work on it.  The shock of finding that Dean had already disassembled the scope was so great that I did forget to snap a better photo of my beautiful scope on the AP mount.  Dean took apart the secondary assembly itself and replaced a plastic gasket with one that he'd specifically developed at Starizona that resolves the particular issue that I was having. 
After spending a good hour on the scope working at the secondary assembly and putting everything back together he declared it to have a clean bill of health and I setup in the parking lot to line out the remainder of my collimation/tilt/alignment issues.  I was again optimistic about the trip the next weekend.  Almost 4 hours of imaging and tweaking and poking and prodding the Hyperstar and CCD camera frustration had again set in.  Dean was perplexed as well and asked me to leave the entire rig with him so that he could look more closely at the camera the next day. 

I made the drive back home and returned on Saturday night where Dean again gave me far more of his time than I deserved in an effort to help resolve the issue.  We spent much time fighting the tilt/tip ring that is supplied with the QHY cameras these days.  Just for the record - the tilt/tip ring on a QHY camera is the most ridiculous solution I've seen in my life.  If we had arrived at a solution that required me to use that idiotic piece of equipment there would be a QHY8PRO on Astromart right now at a fire sale price.  Alas - and thanks entirely to Dean - that ended up being not necessary.  I even told him toward the end of the evening not to worry, that I'd go back to the DSLR for the time being and I was going to get rid of the camera. 
To make a long story short, by eliminating the tilt/tip ring and using a spacer that is about 4mm shorter than is typically called for with the QHY camera bodies, everything snapped suddenly very close into place.  Some minor adjustments to the collimation of the Hyperstar and suddenly - things were very, very close to perfect.  Having spent almost 8 hours in the Starizona parking lot trying to resolve the issue I snapped a quick set of images just to prove to myself that the CCD camera was indeed useable.

As such, here is what I can now call the proper first light from the camera, and I have the crew at Starizona to thank for their patience and persistence in helping me to get this resolved.  As is typical with any trip to Starizona, I didn't get out of there unscathed.  I picked up a Hyperstar compatible dew shield and lens cap for the scope.  Money has a way of getting spent when I'm in that place.  

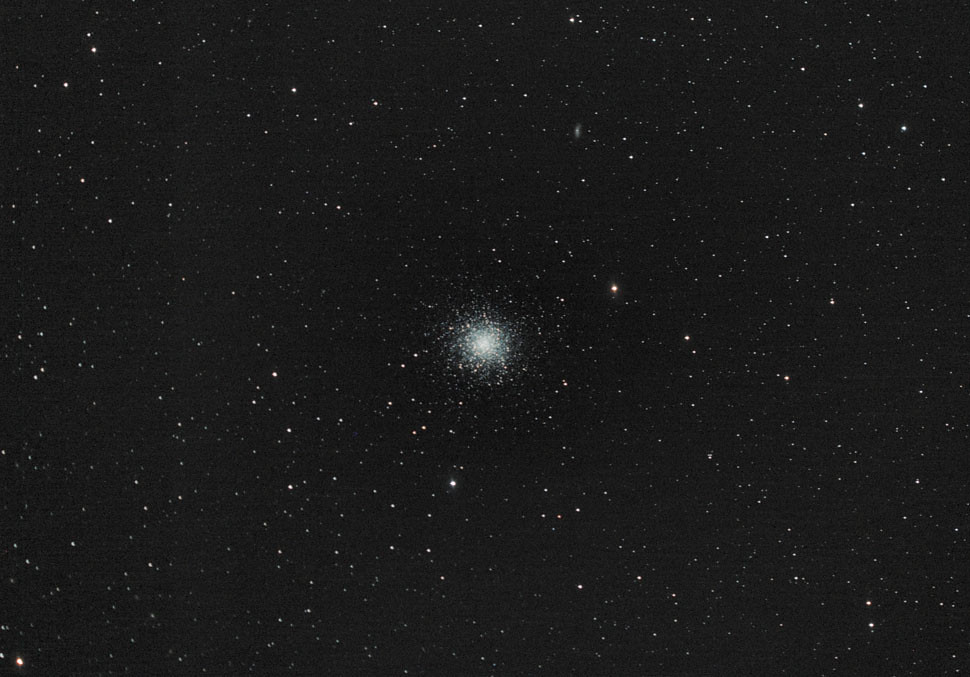
So here it is - M13, a stack of 10 exposures at 30 seconds each, unguided from the heavily, heavily light polluted parking lot of Starizona on Saturday night.  The collimation is still just a touch out in the bottom left corner - but it's far, far better than it was before.  I'll tweak the collimation a final time this Thursday and hopefully I'll return from the cool pines of Northern Arizona with an enormous amount of data to process.  Not a cloud in the forecast with daytime temps around 85ºF (30ºC) and night time temps around 50ºF (10ºC) for all 5 days.